Step 10: Run the Upgrade Cluster Wizard
The Upgrade Wizard manages the upgrade of your Cloudera Runtime software. The Upgrade Wizard is not used for upgrades to Service Packs or Hotfixes.
Loading Filters ... 6.3.4 6.3.3 6.3.1 6.3.0 6.2.1 6.2.0 6.1.1 6.1.0 6.0.1 6.0.0 7.11.3 7.7.3 7.7.1 7.6.7 7.6.1 7.4.4 6.3.4 6.3.3 6.3.2 6.3.1 6.3.0 6.2.1 6.2.0 6.1.1 6.1.0 6.0.2 6.0.1 7.1.9.1000 7.1.9 7.1.8 7.1.7.3000 7.1.7.2000 7.1.7.1000 7.1.7
Minimum Required Role: Cluster Administrator (also provided by Full Administrator)
- Log in to the Cloudera Manager Admin Console.
- Ensure that you have completed the steps to add the Parcel URL in Cloudera Manager. See Step 6: Access Parcels.
- Ensure that all services in the cluster that are being upgraded are running and in good health.
- Click the Actions menu and select Upgrade
Cluster.
The Getting Started screen of the Upgrade Wizard displays.
- Click the Upgrade to Version: drop-down and
select the version of Cloudera Runtime for your upgrade.
The wizard now runs several checks to make sure that your cluster is ready for upgrade. You must resolve any reported issues before continuing.
-
The Install Services section displays any additional services that you need to install to upgrade your cluster.
If you are upgrading a cluster that has the Hive service, you will be prompted to add the Tez, Zookeeper, Hive on Tez, and YARN QueueManager services. -
The Sentry service is replaced by Apache Ranger in CDP Private Cloud Base. If the cluster has the Sentry service installed, you can migrate to Apache Ranger.
The Apache Ranger service depends on the ZooKeeper and Solr services. The upgrade wizard display buttons for installing several dependent services that are required for Apache Ranger. If your cluster does not include these services, buttons will appear to install them.
- Follow the steps for Transitioning the Sentry service to Apache Ranger before continuing.
- If the cluster does not already have the ZooKeeper service, click
the Add ZooKeeper Service button.
The Assign Roles page displays with the role assignment for the ZooKeeper service. You can keep the assigned host or assign the role to a different host.
- Click Continue.
The Review Changes screen displays where you can change the default configurations.
- Click Continue.
The upgrade wizard resumes.
- Click the Add Solr Service button to install the Solr service
dedicated to Apache Ranger.
The Assign Roles page displays with the role assignment for the Solr service. You can keep the assigned host or assign the role to a different host.
- Click Continue.
The Review Changes screen displays where you can change the default configurations.
- Click Continue.
The upgrade wizard resumes.
- Click the Add Ranger Service button
The Assign Roles page displays with the role assignment for the Ranger service.
- Assign the following Ranger roles to cluster hosts:
- Ranger Admin -- you must assign this role to the host you specified when you set up the Ranger database.
- Ranger Usersync
- Ranger Tagsync
- In Setup Database, update the Ranger database parameters:
- Ranger Database Type - Choose either MySQL, PostgreSQL, or Oracle.
- Ranger Database Host - enter the hostname where the Ranger database is running.
- Ranger Database Name - enter the database name created for Ranger.
- Ranger Database User - enter the user created to connect Ranger database.
- Ranger Database User Password - enter the password you created when you created the Ranger database and the user rangeradmin.
- The Ranger Review Changes screen displays. Review the
configurations and make any necessary changes. You must provide values for the
following:
- Ranger Admin User Initial Password – choose a password.
- Ranger Usersync User Initial Password – choose a password.
- Ranger Tagsync User Initial Password – choose a password.
- Ranger KMS Keyadmin user initial Password – choose a password.
- Ranger Admin Max Heapsize – set the default value instead
of minimum value by clicking the curved blue arrow.

- Ranger Tagsync Max Heapsize – set the default value instead
of minimum value by clicking the curved blue arrow.
- Ranger Usersync Max Heapsize – set the default value
instead of minimum value by clicking the curved blue arrow.
- If enabling Ranger TLS, see Configure TLS/SSL for Ranger in a manually configured TLS/SSL environment.
- Update Auth-To-Local Rule in Hdfs.
IF the Additional Rules to Map Kerberos Principals to Short Names (hadoop.security.auth_to_local) configs
have been updated, THEN you must:
- Update the Additional Rules to Map Kerberos Principals to Short Names
config to include the following rules for Ranger & Ranger KMS services
principals before
upgrade.
RULE:[2:$1@$0](rangeradmin@<REALM>)s/(.*)@<REALM>/ranger/
RULE:[2:$1@$0](rangertagsync@<REALM>)s/(.*)@<REALM>/rangertagsync/
RULE:[2:$1@$0](rangerusersync@<REALM>)s/(.*)@<REALM>/rangertagsync/
RULE:[2:$1@$0](rangerkms@<REALM>)s/(.*)@<REALM>/keyadmin/
- Append these rules to the existing ones getting used.
- Custom rules syntax may be applied to these rules. Make sure the principals are always mapped to the above-provided user names.
- Update the Additional Rules to Map Kerberos Principals to Short Names
config to include the following rules for Ranger & Ranger KMS services
principals before
upgrade.
- If you have a workload Solr service besides the Solr instance dedicated to the Ranger
service (infra-solr) in your upgraded cluster, you must add its name to Knox as a custom
service parameter for both
Knox Simplified Topology Management - cdp-proxyandKnox Simplified Topology Management - cdp-proxy-api. This is to avoid Knox forwarding requests to the wrong Solr instance. If the only Solr instance in your cluster is the one dedicated to Ranger, skip this step.Provide the workload Solr service name in the
SOLR:discovery-service-display-name=[***WORKLOAD-SOLR-SERVICE-NAME***]format, replacing [***WORKLOAD-SOLR-SERVICE-NAME***] with the name of the workload Solr service.For example,
SOLR:discovery-service-display-name=SOLR-1: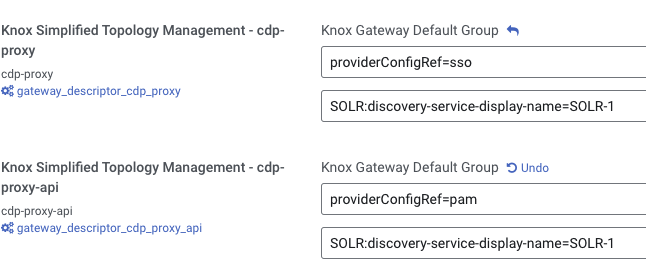
For more information, see Add custom service parameter to descriptor in Apache Knox Authentication.
-
If your cluster does not have the YARN Queue Manager, installed, a button will appear to add the YARN Queue Manager service because it is required for the Capacity Scheduler, which is the supported scheduler.

The first step of Adding YARN Queue Manager Service is to copy scheduler settings. For more information about how to transition from Fair Scheduler to Capacity Scheduler, see Fair Scheduler to Capacity Scheduler transition.
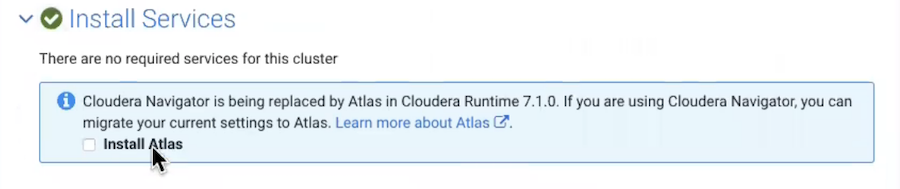
- Enable Atlas install.
If the cluster being upgraded was running Navigator, the upgrade wizard shows a note recommending that you enable Atlas in the new cluster. Check the Install Atlas option.
- Install Atlas dependencies.
The wizard steps through the installation for Atlas' dependencies, assuming these services haven't already been included in the installation:
- ZooKeeper. Assign one or more hosts for the ZooKeeper role.
- HDFS. Already included in the installation.
- Kafka. Select the optional dependency of HDFS. Atlas requires configuring the Broker service only, not MirrorMaker, Connect, or Gateway.
- HBase. Atlas requires configuring HBase Master and RegionServers only, not REST or Thrift Server. Assign a Master role on at least one host. Assign RegionServers to all hosts.
- Solr. Assign a host for the Solr Server role. Set the Java Heap Size of Solr Server in Bytes property to 12 GB (to support the migration operation).
For recommendations on where in the cluster to install the service roles, see Runtime Cluster Hosts and Role Distribution.
- Click
Add Atlas Service. The wizard steps through choosing a host and
setting migration details.
- Set the host for the Atlas server roles and click Continue.
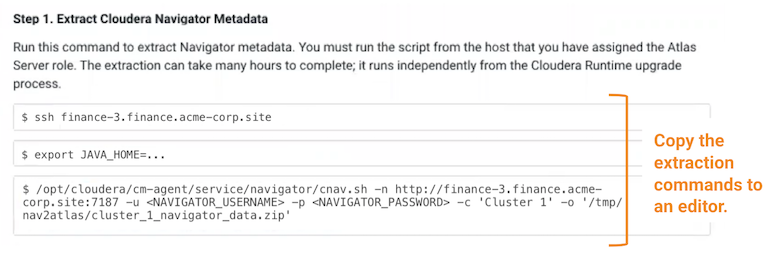
- The Atlas Migrate Navigator Data screen displays. This screen contains migration commands that are customized to your environment. When you fill in the output file paths, the command text changes to incorporate your settings.
- Set migration data-staging locations.
The migration process creates two data files on the local file system on the host where Atlas is installed. Make sure there is enough disk space to hold these files; see Estimating the time and resources needed for transition.
- Copy the extraction command text to an
editor.
- Copy the transformation command
text to an editor.
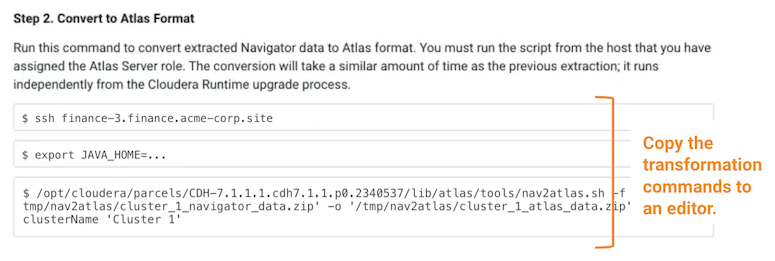
- Confirm the output file location. This is the location where Atlas will look for the content to import. Make sure it matches the location you plan to use for the output of the transformation command.
- Click Continue.
- Set migration data-staging locations.
- The Atlas Enable Migration Mode screen displays. Review the
Atlas Safety Valve content and click Continue.
After the migration is complete, you will manually remove these settings to start Atlas in normal operation.
- The Atlas Review Changes screen displays. Review the
configurations and make any necessary changes.You must provide a value for the
following:
- Admin Password – choose a password for the preconfigured admin user.
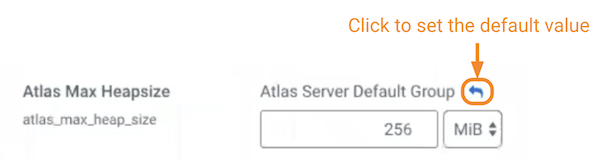
- Atlas Max Heapsize – set the max heapsize to the default
value by clicking the curved blue arrow. If you plan to migrate content from Cloudera Navigator to Atlas, consider setting
the heapsize to 16 GB.
- Click Continue.
To complete the Navigator-to-Atlas migration outside of the Cloudera Runtime upgrade, see Transitioning Navigator data using customized scripts.
- The Other Tasks section lists other tasks or reminders to note before continuing. Select the option to confirm that you understand before continuing.
- The Inspector Checks section displays sever
inspectors you must run before continuing. If these inspectors report
errors, you must resolve those before continuing.
- Click the Show Inspector Results button to see details of the inspection.
- Click the Run Again button to verify that you have resolved the issue.
- If you are confident that the errors are not critical, select Skip this step. I understand the risks..
The Inspector Checks section includes the following inspectors:- Host Inspector
- Service Inspector
Run these inspectors and correct any reported errors before continuing.
- The Database Backup section asks you to verify that you have completed the necessary backups. Select Yes, I have performed these steps.
- Click Continue. (The Continue button remains greyed out until all upgrades steps are complete and all warnings have been acknowledged.)
- Click Continue again to shut down the cluster
and begin the upgrade.
The Upgrade Cluster Command screen opens and displays the progress of the upgrade.
- When the Upgrade steps are complete, click
Continue.
The Summary page opens and displays any additional steps you need to complete the upgrade.
- Click Continue.