Step 4: Upgrading the Cloudera Manager Agents
Loading Filters ... 6.3.4 6.3.3 6.3.1 6.3.0 6.2.1 6.2.0 6.1.1 6.1.0 6.0.1 6.0.0 7.11.3 7.7.3 7.7.1 7.6.7 7.6.1 7.4.4 6.3.4 6.3.3 6.3.2 6.3.1 6.3.0 6.2.1 6.2.0 6.1.1 6.1.0 6.0.2 6.0.1 7.1.9.1000 7.1.9 7.1.8 7.1.7.3000 7.1.7.2000 7.1.7.1000 7.1.7
Minimum Required Role: Cluster Administrator (also provided by Full Administrator)
Upgrade the Cloudera Manager Agents (Cloudera Manager 7.0.3 and higher)
- Ensure that the
ptrace_scopeoperating system control is set to 0:The Cloudera Manager Agent installation process uses a re-parenting mechanism to ensure that running Cloudera Services are not impacted by the Cloudera Manager Agent upgrade. This re-parenting mechanism utilizes the Linux kernel's ptrace capability. If the
ptrace_scopesystem control is set to a non-zero value, then the installer will not be able to re-parent running Cloudera services. The Cloudera Manager Agent RPM will refuse to install if theptrace_scopecontrol has a non-zero value. For more information, see https://www.kernel.org/doc/Documentation/security/Yama.txt- Verify that the value of
ptrace_scopeis set to zero. Run the following command to check the value:cat /proc/sys/kernel/yama/ptrace_scope - If the value is not set to
0, set the value to0by running the following command on all cluster hosts:
If you do not want to allowecho 0 >> /proc/sys/kernel/yama/ptrace_scopeptrace_scopeto run, run the following command on all cluster hosts to force the Cloudera Manager Agent upgrade:touch /tmp/CLOUDERA_SKIP_PTRACE_CHECK_ON_UPGRADES - If necessary, you can set
ptrace_scopeto its original value after the agent upgrades are complete.
- Verify that the value of
-
After upgrading and starting the Cloudera Manager server, open the Cloudera Manager Admin Console (if you have not already done so) using the following URL:
https://cloudera_Manager_server_hostname:7183/cmf/upgradeThe Upgrade Cloudera Manager screen displays: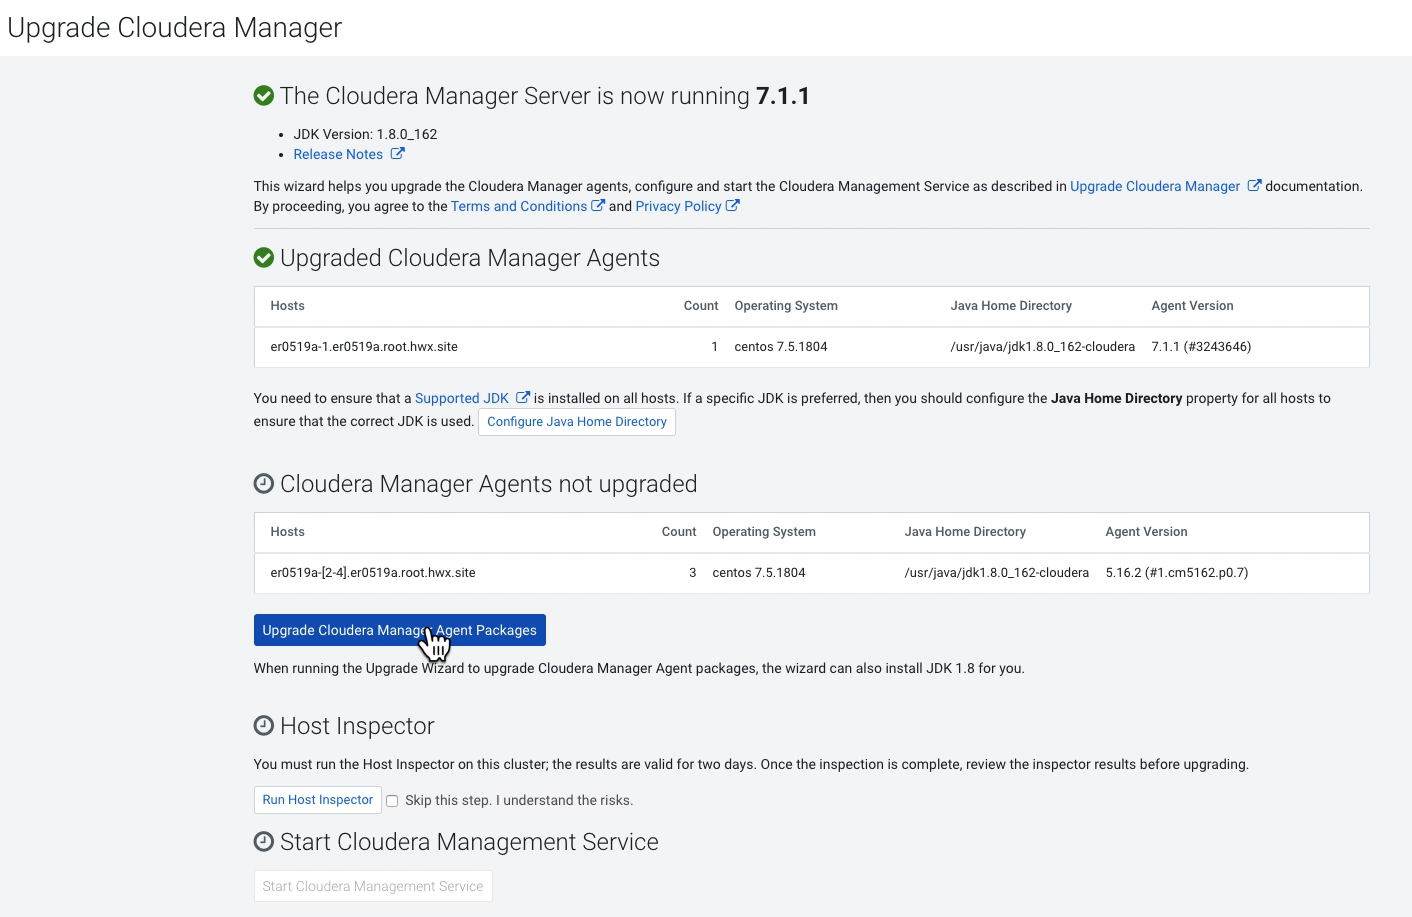
- Click Upgrade Cloudera Manager Agent packages
The Upgrade Cloudera Manager Agent Packages page displays the Select Repository step.
- Select one of the following:
- Select Public Cloudera Repository if the Cloudera Manager server host has access to the internet.
- Select the Custom Repository If you are
using a local
package repository instead of the public repository at
https://archive.cloudera.com, option and enter the Custom Repository URL.
- Click Continue.
- The Select JDK screen displays the available
options for the JDK used in the cluster. Choose one of the following
options to install a JDK:
- Manually Manage JDK – Select this option if you have already installed a supported JDK. For information on installing a JDK, see Upgrading the JDK.
- Install a Cloudera-provided version of OpenJDK – Cloudera Manager installs OpenJDK 8 on all your cluster hosts, except for the Cloudera Manager server host(s).
- Install a system-provided version of OpenJDK – Cloudera Manager installs the default version of OpenJDK provided by the host operating system.
- Click Continue.
The Enter Login Credentials page displays.
- Specify the credentials and initiate Agent installation:
- Select root for the
rootaccount, or select Another user and enter the username for an account that has password-lesssudopermission. - Select an authentication method:
- If you choose the All hosts accept same password option, enter and confirm the password.
- If you choose the All hosts accept same private key option, provide a passphrase and path to the required key files.
- Modify the default SSH port if necessary.
- Specify the maximum Number of Simultaneous Installations to run at once. The default and recommended value is 10. Adjust this parameter based on your network capacity.
- Select root for the
- Click Continue.
The Cloudera Manager Agent packages and, if selected, the JDK are installed.
- When the installations are complete, click
Finish.
The Upgrade Cloudera Manager page displays the status of the upgrade. If you see a message listing Cloudera Manager Agents not upgraded, wait a few minutes for the agents to heartbeat and the click the Refresh button.

If some hosts do not report a heartbeat, you must upgrade the Cloudera Manager Agents manually. Do the following on these hosts:- Ensure that the hosts have access to the package repositories. See Configure a Repository for Cloudera Manager.
- Run the following commands on all affected hosts to remove the
cloudera-manager-agent, cloudera-manager-daemons, and
cloudera-manager-server packages and install the agent and
daemons. (Omit
cloudera-manager-serveron the Cloudera Manager server host):Operating System Command RHEL sudo yum remove cloudera-manager-daemons cloudera-manager-agent cloudera-manager-serversudo yum clean all sudo yum install cloudera-manager-agent cloudera-manager-daemonsSLES sudo zypper remove cloudera-manager-daemons cloudera-manager-agent cloudera-manager-serversudo zypper refresh -s sudo zypper install cloudera-manager-agent cloudera-manager-daemonsUbuntu or Debian sudo apt-get purge cloudera-manager-daemons cloudera-manager-agent cloudera-manager-serversudo apt-get update sudo apt-get install cloudera-manager-agent cloudera-manager-daemons - Copy the agent's
config.inifile from the backup taken before upgrading to/etc/cloudera-scm-agent/config.ini. (See Back Up Cloudera Manager Agent) - Restart the
agents:
sudo systemctl stop cloudera-scm-supervisord.service
sudo systemctl start cloudera-scm-agent
- After the Agents are all upgraded, Click Run Host Inspector to run the host inspector. Inspect the output and correct any warnings. If problems occur, you can make changes and then rerun the inspector.
- When you are satisfied with the inspection results, click Start the Cloudera Management Service.
- Confirm that you want to start the Cloudera Management Service by clicking Continue.
- After the Cloudera Management Service has started, click
Finish.
You will see a message indicating that the Cloudera Management Service has started.
The upgrade is now complete.
- Click the Home Page link to return to the
Home page. Review and fix any critical configuration issues. You may
need to restart any clusters if they indicate stale configurations.
To return to the Upgrade Cloudera Manager page, go to .
- If you stopped any clusters before upgrading Cloudera Manager, start them now. (For each cluster, go to .)
- If you set
ptrace_scopeto0and want to use the original or a different value, you can reset it by running the following command on all hosts:echo [new_value] >> /proc/sys/kernel/yama/ptrace_scope - If you have the Embedded Container
Service (ECS) deployed in any clusters, do the following
- Restart the ECS Cluster. Go to the ECS cluster, click the actions menu and select Restart.
- Unseal the Vault. Go to the ECS service and click .